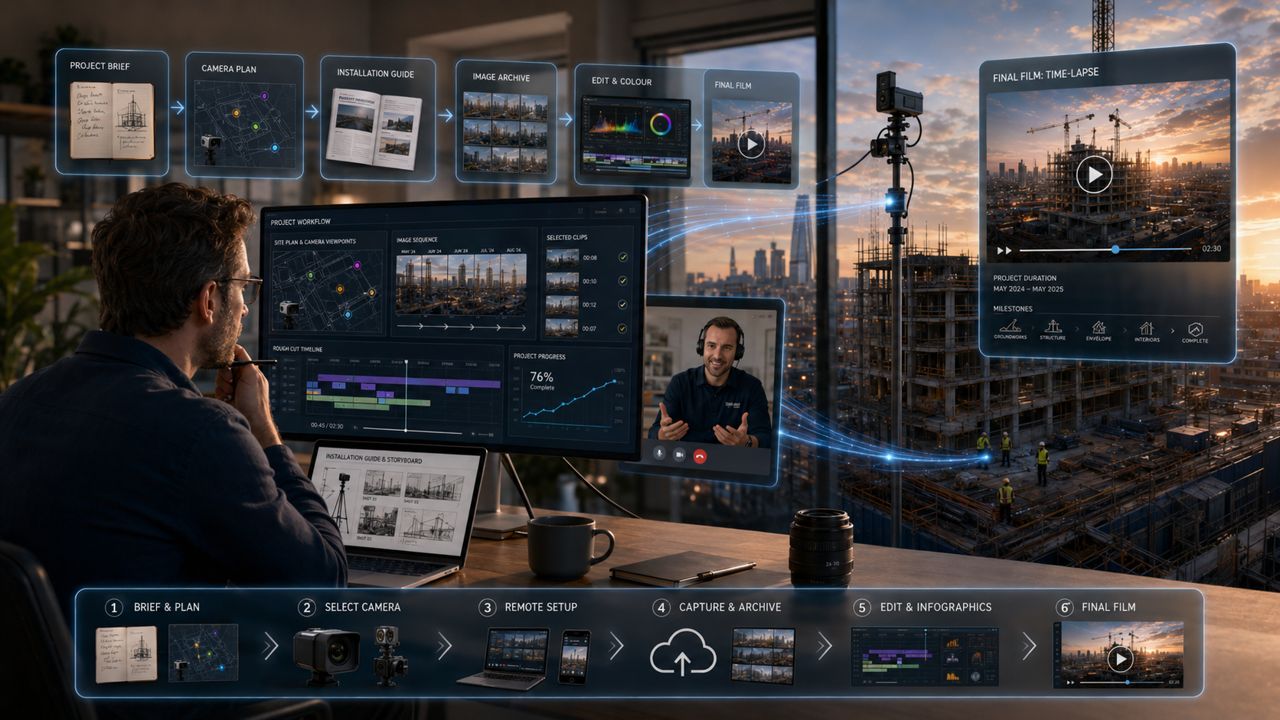
Not every construction project needs a full installation team to travel to site.
In many cases, the client already has local contractors, electricians, IT support or site staff who can install the equipment. What they often need is something different: clear guidance on what to buy, where to install it, how to configure it, which platform to use, and how to turn the captured material into a professional time-lapse film.
That is where remote construction time-lapse consulting becomes useful.
We help clients organise construction time-lapse filming on their own sites, even when the project is in another city, region or country. The client buys and installs the recommended equipment locally. We provide the technical plan, setup instructions, platform guidance, ongoing support and final video production.
The result is a practical way to create a professional time-lapse system without needing a full production crew on site from day one.
Who This Service Is For
Remote time-lapse consulting is useful for clients who want to document a construction project but prefer to manage the physical installation locally.
This may include:
- developers working in different cities or regions;
- contractors managing several sites;
- property owners building or refurbishing an asset;
- architects and consultants who want a visual record of progress;
- investors or project teams who need regular visual updates;
- companies working in locations where specialist time-lapse installers are not available;
- clients who already have a local electrician, IT contractor or site team.
The service is designed for people who want a reliable time-lapse setup but do not want to guess which camera, platform, mounting method or workflow will work best.
How the Process Works
The process usually starts with a simple request.
A client contacts us and explains that they want to film their construction site using time-lapse technology. The site may be in the UK, Europe, the Middle East, North America or any other region. The client may not yet know which camera to buy, where to place it, how to connect it or which platform to use.
We then help turn that idea into a practical setup plan.
Our work can include:
- analysing the construction site;
- understanding the project type and duration;
- recommending suitable camera options available in the client’s region;
- advising on camera placement and coverage;
- selecting a suitable cloud or time-lapse platform;
- preparing installation and configuration instructions;
- helping the local team connect the camera;
- checking the first images and live view;
- supporting the client during the project;
- producing progress videos, presentations and final time-lapse films.
The client keeps control of the equipment and local installation. We provide the expertise, workflow and creative production.
Step 1: Understanding the Project
Before recommending any equipment, we need to understand the project.
A small residential refurbishment does not need the same setup as a large logistics centre, hotel, infrastructure project or multi-building development. The size of the site, the height of the structure, the project duration, the available power, the internet connection and the final use of the material all affect the technical solution.
We usually look at:
- the type of construction;
- the size and shape of the site;
- the expected project duration;
- the main stages of work;
- available mounting points;
- access to power;
- mobile or network connectivity;
- local weather conditions;
- the required image quality;
- whether live view is needed;
- how the final material will be used.
This first stage is important because the wrong camera or viewpoint can limit the whole project. A camera that is fine for a small internal refurbishment may not work for a large external construction site. A wide-angle time-lapse camera may be perfect for one location, while a PTZ or fixed IP camera may be better for another.
The goal is to match the equipment to the project, not force every site into the same setup.
Step 2: Choosing the Right Cameras
Once we understand the project, we research which cameras are available in the client’s city, country or region.
This is a practical part of the service. Some specialist cameras may be easy to buy in one market but difficult or expensive to import into another. Local availability, warranty, delivery time, network compatibility, power options and budget all matter.
Depending on the project, we may consider:
- professional construction time-lapse cameras;
- solar-powered time-lapse cameras;
- 4G/5G-enabled cameras;
- fixed IP cameras;
- industrial PTZ cameras;
- high-resolution photo cameras with scheduled capture;
- weatherproof camera systems;
- cameras that can upload to cloud platforms;
- cameras that work with local NVR or FTP storage.
We do not recommend cameras simply because they are expensive or popular. We look at what will work best for the specific site.
For example, a remote rural project may need solar power and mobile data. A city-centre construction site may have good mains power but limited mounting options. A large site may need several viewpoints. A short project may need a simpler setup. A marketing-focused project may need higher image quality and a more cinematic final output.
The recommendation is based on the task, the site and the budget.
Step 3: Planning the Viewpoints
A good time-lapse film starts with a good camera position.
For remote projects, viewpoint planning is especially important because we may not physically visit the site. Instead, we can work from site plans, maps, photos, video calls, drone images, drawings or information from the local team.
We help the client decide:
- where the camera should be installed;
- what part of the site it should cover;
- whether one camera is enough;
- whether multiple viewpoints are needed;
- how high the camera should be mounted;
- whether the view may become blocked as the building rises;
- how the sun, shadows and weather may affect the image;
- whether neighbouring properties or public areas should be avoided;
- whether the position is safe and practical for installation.
The aim is to create a view that is both useful and visually strong.
For project monitoring, the camera needs to show the right work areas. For a final film, it also needs a composition that looks good over time. For stakeholder reporting, the view should be clear and easy to understand. For website content, the image should feel professional and presentable.
Step 4: Selecting the Right Platform
The camera is only one part of the system. The platform is just as important.
A construction time-lapse platform receives, stores, organises and displays the images. It may also provide live view, user access, sharing links, automated videos, image archive, comparison tools, alerts, dashboard views or export options.
Different platforms suit different projects.
Some clients need a simple cloud archive. Others need live view for stakeholders. Some need automated progress videos. Some need high-resolution image storage for final film production. Some need a platform that works with a specific camera brand. Others need a more flexible solution that can receive images from IP cameras, FTP uploads or custom workflows.
Possible platform categories include:
- dedicated construction camera platforms;
- manufacturer cloud platforms;
- time-lapse camera ecosystems;
- IP camera cloud storage services;
- FTP or SFTP image upload workflows;
- NVR-based recording with scheduled image export;
- custom cloud storage and archive systems;
- project dashboard platforms.
Examples of platform ecosystems on the market include myTikee by Enlaps, Evercam, EarthCam, OxBlue, TrueLook, CameraFTP and other regional or camera-specific solutions. The right choice depends on where the project is located, which cameras are available, what the client needs to see, how much storage is required, and how the final material will be used.
Our role is to compare the options and recommend the most practical platform for the client’s situation.
Step 5: Preparing Clear Installation Instructions
After the camera and platform are selected, we prepare instructions for the client’s local team.
These instructions are designed to be practical. The person installing the camera may be a local contractor, electrician, IT technician, site engineer or member of the client’s team. They need a clear setup plan, not vague creative advice.
The instruction pack may include:
- recommended camera model and accessories;
- mounting position and direction;
- suggested camera height;
- framing examples;
- power requirements;
- connectivity requirements;
- SIM card or network setup guidance;
- platform registration steps;
- capture interval settings;
- upload settings;
- image resolution recommendations;
- user access settings;
- testing checklist;
- maintenance recommendations.
Where useful, we can also include diagrams, marked-up images, installation notes and example screenshots.
The goal is to make the installation as straightforward as possible for the local team.
Step 6: Supporting the First Setup
Once the camera is installed, we help check that the system is working properly.
This stage can include reviewing the first images, checking the live view, confirming the framing, testing uploads, adjusting capture intervals and making sure the archive is being stored correctly.
We may ask the local team to adjust:
- camera angle;
- horizon level;
- focus;
- exposure settings;
- field of view;
- upload frequency;
- time zone settings;
- power or network configuration;
- platform permissions.
This early check is important. A small problem at the beginning can affect months of footage. It is much better to correct the view or settings in the first few days than discover a problem halfway through the project.
Step 7: Ongoing Support During the Project
After installation, we can continue supporting the client throughout the build.
Construction sites change. Scaffolding may block the view. Power may be interrupted. A camera may need repositioning. A platform subscription may need adjusting. The client may want monthly progress videos or selected images for reporting.
Our support can include:
- checking that images are still being captured;
- reviewing image quality;
- advising on camera adjustments;
- helping with platform access;
- preparing regular progress clips;
- exporting selected images;
- creating stakeholder presentation material;
- helping the client understand what can be improved;
- planning additional camera angles if the project changes.
This is one of the main benefits of the consulting model. The client does not need to become a time-lapse specialist. They can manage the local hardware while we support the workflow and final output.
Step 8: Creating Time-Lapse Films From the Captured Material
The final value of the system is not only in the archive. It is in what can be created from it.
Once the images are being collected, we can turn them into professional visual content. This may be a full construction time-lapse film at the end of the project, or shorter videos throughout the build.
Our production work can include:
- image selection;
- cleaning the sequence;
- removing unusable frames;
- stabilisation;
- deflicker and brightness smoothing;
- colour grading;
- speed adjustment;
- editing the sequence around key milestones;
- adding titles and captions;
- adding infographics;
- adding maps, dates or progress markers;
- combining several camera angles;
- adding drone footage or final photography;
- creating music-based or presentation-ready edits.
The result is not just an automatic video generated from raw images. It is a finished film that looks good, explains the project clearly and can be used in professional communication.
What We Can Create From the Material
A construction time-lapse archive can support much more than one final film.
From the same material, we can produce:
- final project time-lapse films;
- monthly progress videos;
- weekly update clips;
- social media edits;
- website hero videos;
- LinkedIn posts;
- investor updates;
- client presentations;
- tender and capability content;
- case study visuals;
- before-and-after comparisons;
- still images for reports;
- presentation decks with selected project images;
- milestone videos with infographics.
This makes the system useful throughout the project, not only after completion.
For example, a developer may use monthly clips for investor updates. A contractor may use the final film in tenders. A client may use selected images in board presentations. A marketing team may use short edits on LinkedIn or the company website.
The same archive can serve different audiences.
Why Remote Consulting Can Be More Practical
A full-service time-lapse installation is still the right choice for many projects. But it is not always necessary or practical.
Remote consulting can be a better fit when:
- the site is far from specialist installers;
- the client has a trusted local installation team;
- equipment can be purchased more easily in the client’s region;
- the budget does not allow for travel and full on-site service;
- the project needs a flexible setup;
- the client wants to own and manage the hardware;
- the main value is in setup guidance, workflow support and final production.
This approach reduces complexity. The client does not need to import a complete service from another country. They can buy equipment locally, install it with local support and still receive professional guidance and post-production.
A Complete Time-Lapse Setup Without Guesswork
Organising a construction time-lapse system can seem simple at first: buy a camera, install it on site and start recording.
In reality, there are many decisions that affect the result.
Which camera should be used? Where should it be mounted? Will it have power? Will the mobile signal be strong enough? Which platform will store the images? Can the client access the live view? Will the image quality be good enough for a final film? What happens if the camera moves, stops uploading or captures the wrong angle?
Our consulting service is designed to answer these questions before they become problems.
We help the client create a complete time-lapse workflow: from camera selection and installation guidance to platform setup, ongoing support and final film production.
The client installs the system locally. We help make sure it is planned properly, works reliably and produces material that can be turned into useful, professional content.
A Practical Way to Film Construction Progress Anywhere
Construction projects happen everywhere. Time-lapse expertise does not always need to be physically on site.
With the right guidance, a client can organise a reliable time-lapse system in almost any location. Cameras can be sourced locally. Installation can be handled by the site team or local contractors. Images can be uploaded to a suitable platform. We can then support the workflow remotely and turn the captured material into films, presentations and progress content.
For clients who want professional construction time-lapse without a full on-site production team, this is a practical and flexible solution.
It gives the project team a clear plan, the right equipment, a suitable platform and a professional final result — wherever the construction site is located.